Showing posts with label DIY. Show all posts

Sunday, April 26, 2015

Teacher Appreciation Week

Here are some great gifts for teacher appreciation week:


Teacher Appreciation Gift Ideas in a Mason Jar #teacherappreciation
Some ADORABLE ideas
 from The Country Chic Cottage.
The Ball tags are even included 
~*~*~*~*~*~*~*~*~*~*~*~*~*~*~*~*~*~*~*~*~*~*~*~

This cute letter made from
 crayons can be found
~*~*~*~*~*~*~*~*~*~*~*~*~*~*~*~*~*~*~*~*~*~*~*~

Just an absolutely sweet
 gift for any teacher from Domestically Speaking.

~*~*~*~*~*~*~*~*~*~*~*~*~*~*~*~*~*~*~*~*~*~*~*~
Some simple ideas for
any teacher gift from I Saw That Going Differently In My Mind....
~*~*~*~*~*~*~*~*~*~*~*~*~*~*~*~*~*~*~*~*~*~*~*~
Keep Calm and Teach On Frame from Call Me Crafty Al

~*~*~*~*~*~*~*~*~*~*~*~*~*~*~*~*~*~*~*~*~*~*~*~
Simple way to give a gift card from eighteen 25

~*~*~*~*~*~*~*~*~*~*~*~*~*~*~*~*~*~*~*~*~*~*~*~
Simple supply kit from less cake more frosting

~*~*~*~*~*~*~*~*~*~*~*~*~*~*~*~*~*~*~*~*~*~*~*~
A sweet simple idea to
brighten any classroom
from i should be mopping the floor

~*~*~*~*~*~*~*~*~*~*~*~*~*~*~*~*~*~*~*~*~*~*~*~
A CUTE little printable from Bloom Designs

~*~*~*~*~*~*~*~*~*~*~*~*~*~*~*~*~*~*~*~*~*~*~*~
A Supply Cake Idea from Three Pugs and a Little Boy

~*~*~*~*~*~*~*~*~*~*~*~*~*~*~*~*~*~*~*~*~*~*~*~

Blog_teachercups
Sweet drink from lisa storms

~*~*~*~*~*~*~*~*~*~*~*~*~*~*~*~*~*~*~*~*~*~*~*~
If Teachers Were Apples I'd Pick You - CUTE gift idea and free print on { lilluna.com }

Beyond simple and a huge necessity from lil luna

~*~*~*~*~*~*~*~*~*~*~*~*~*~*~*~*~*~*~*~*~*~*~*~

Who doesn't love a little nail
polish and  nail file from she's kinda crafty
~*~*~*~*~*~*~*~*~*~*~*~*~*~*~*~*~*~*~*~*~*~*~*~

If you have any other great teacher appreciation gift ideas share them with us, we'd LOVE to know!

Tuesday, August 5, 2014

The Bag Needs A Container

I decided to change over my previous blog to this blog. You can still find me over a at twodaisiesandanelephant.blogspot.com. However, most of my blog posts from there will be transferred over to this one. So, at times you may see the "twodaisiesandanelephant" logo going across many of the photos. No worries, it is me. I promise.

Okay, so we all have it. That moment when you open up the doors underneath the sink and every bag falls out. Of course, you may have a few words come out and then shove them back in. Talking about how you'll find something to put those bags in, then of course you never do it. Getting more and more frustrated each time. Of course, that's my husband and I.

So....

One day after perusing Pinterest, I found an easy way to kind of maintain the bags and store them in other places. You know, where they're actually needed but aren't really there. This way you don't have to walk everywhere just to grab a bag.

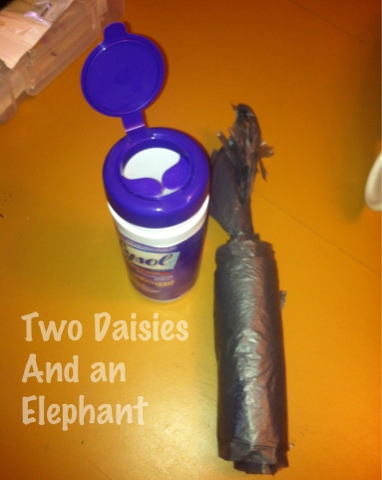
So, like I said while I was perusing I found this awesome way to reuse a Lysol/Clorox/Store Brand/Whatever You Use Container into a plastic bag holder.

It didn't require shoving bags into a jumbled up mess. It's so neatly organized. It's awesome.

I clicked on the picture and found this adorable little website called Infarrantly Creativewith detailed directions on how to complete this.

I grabbed all my grocery bags and threw them into the laundry hamper.


I then picked through each. Throwing away any that had random holes in it. I then flattened out the good ones on the table.


Once flattened, I would fold them in half. Smoothing them out and placing them to the side. I did this about 14 times.


As I finished that, I laid each on top of the end of the next one. Making a little train.


I then tightly rolled them together, pushing any air out as I went.


Grabbed my Lysol Container and placed the bags into it. With the tail sticking out.

 
Taking the tail, I pushed it through the opening of the top of the container. Sealing it.


I did leave the outside blank. This one just hangs out next to my daughters trash can. You can't see it. So it's all good.

Oh and let me just say, this has become ridiculously hand when it comes to replacing the trash bags in Baby E's trash can. Just pull, replace, and go.

Wednesday, July 30, 2014

Cork Board Project

I decided to change over my previous blog to this blog. You can still find me over a at twodaisiesandanelephant.blogspot.com. However, most of my blog posts from there will be transferred over to this one. So, at times you may see the "twodaisiesandanelephant" logo going across many of the photos. No worries, it is me. I promise.


I haven't quite figured out what I'm going to do with this cork board yet, but I'm thinking of quite a bit of possibilities! 

Here a few:

Thinking of maybe a place to store important notes in my makeshift office...
An art space for Baby E during each of the holidays...
A place to store menu's/weekly meals in the kitchen...
A place to store some of my husbands mini tools in the shed...

Wednesday, July 23, 2014

The Game of Keys

I decided to change over my previous blog to this blog. You can still find me over a at twodaisiesandanelephant.blogspot.com. However, most of my blog posts from there will be transferred over to this one. So, at times you may see the "twodaisiesandanelephant" logo going across many of the photos. No worries, it is me. I promise.

Every time I go to open up my front door, I can never tell which key is which. It's almost like a game. I have to feel out the numbers and the letters to know which one goes to the back door and which one goes to the front door. Sadly, the only key that I know doesn't go to this house is the key to my mama's house which has a rubber thing around it.

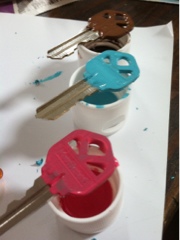
So, since I was tired of playing the game every time I came home. I decided to paint my keys.

First, I tried it with nail polish as seen here on A Bubbly Life; I saw them on several boards on Pinterest. Now, I didn't quite like the way the keys were looking with the nail polish, so I decided to use my acrylic paint to paint them. The acrylic paint gave it a little bit more of a vibrant look.

Here's the first with the nail polish:


Then with the acrylic paint:


Alrighty, now that I can actually tell which key goes to which door. Let me explain to you how I did it.

It's pretty much like the directions with the nail polish. I had to clean my keys first since when my husband takes my keys they come back dirty. I've asked several times how and never get a straight answer. Who knows. Anyways...

* I grabbed some dried wipes from one of Baby E's wipe containers and wet them to re-moisture them (It mysteriously showed up upstairs... I guess it's from her days of sleeping in the bassinet?)

* I then dried them off with a paper towel and grabbed a few of my paints.

* I found that one paint brush worked WAY better than the others, so I stuck with this one as I painted each.

* The worse part was the drying. Having to wait for each side to dry felt like FOREVER!

* Once both sides dried I added them to my key chain.


Now I just have to go out before I can use them again! Hopefully the Game of Keys is over... but there again who knows?