Tuesday, August 5, 2014

The Bag Needs A Container

I decided to change over my previous blog to this blog. You can still find me over a at twodaisiesandanelephant.blogspot.com. However, most of my blog posts from there will be transferred over to this one. So, at times you may see the "twodaisiesandanelephant" logo going across many of the photos. No worries, it is me. I promise.

Okay, so we all have it. That moment when you open up the doors underneath the sink and every bag falls out. Of course, you may have a few words come out and then shove them back in. Talking about how you'll find something to put those bags in, then of course you never do it. Getting more and more frustrated each time. Of course, that's my husband and I.

So....

One day after perusing Pinterest, I found an easy way to kind of maintain the bags and store them in other places. You know, where they're actually needed but aren't really there. This way you don't have to walk everywhere just to grab a bag.

So, like I said while I was perusing I found this awesome way to reuse a Lysol/Clorox/Store Brand/Whatever You Use Container into a plastic bag holder.

It didn't require shoving bags into a jumbled up mess. It's so neatly organized. It's awesome.

I clicked on the picture and found this adorable little website called Infarrantly Creativewith detailed directions on how to complete this.

I grabbed all my grocery bags and threw them into the laundry hamper.


I then picked through each. Throwing away any that had random holes in it. I then flattened out the good ones on the table.


Once flattened, I would fold them in half. Smoothing them out and placing them to the side. I did this about 14 times.


As I finished that, I laid each on top of the end of the next one. Making a little train.


I then tightly rolled them together, pushing any air out as I went.


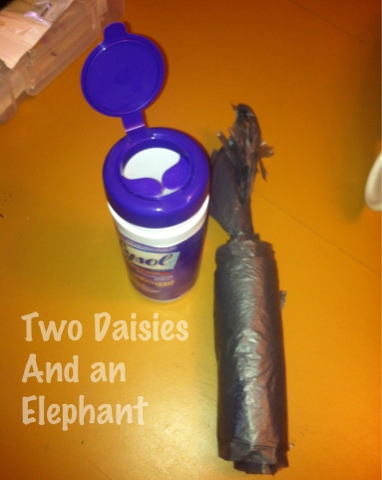
Grabbed my Lysol Container and placed the bags into it. With the tail sticking out.

 
Taking the tail, I pushed it through the opening of the top of the container. Sealing it.


I did leave the outside blank. This one just hangs out next to my daughters trash can. You can't see it. So it's all good.

Oh and let me just say, this has become ridiculously hand when it comes to replacing the trash bags in Baby E's trash can. Just pull, replace, and go.

Monday, August 4, 2014

Em's 6 Month Favorites

Baby E has seriously grown up! I cannot believe that she's 7 month's old now, time has seriously flown by. It feels like just yesterday we were in the hospital waiting for our turn for a c-section. Anyways, Baby E still plays quite a bit with her toys from months prior, but these items have started really stick when it comes to play time. We've even ventured into play with items around the home... you know paper (LOVES PAPER), crinkly bags (she's supervised... no worries), the dogs (poor things).... however, here are a few things that she's really started to enjoy. 


COSCO Cosco Beep beep Walker Bumper Gals    Fisher-Price Laugh and Learn Click N' Learn Remote Fisher-Price Lil Laugh 'n Learn Jumperoo
Cosco Beep Beep WalkerFisher Price Laugh and Learn RemoteFisher Price Lil' Laugh and Learn Jumperoo

I think the thing she enjoys the most besides these toys is just being outdoors in her exersaucer. We have one specifically for when we go out and she loves to play in it out in the shade. It just seems to make her day when we're able to go out and play. 

Does your 6 month old have any favorite toys or activities? Share below we'd love to hear!

Friday, August 1, 2014

Our Bath Time Favorites - For those First Few Months

When our daughter was born we were not able to give her a traditional bath for several months. For the first couple of months every other night we would give her a sponge bath over the sink. Mostly because she had a cast on one of her legs and it was easier to wash her body avoiding the cast then wrap her up to wash her hair. All over the kitchen sink.

Now, when she finally got her cast off we were able to give her a bath in her baby tub. And of course we made this into a huge bath party. My husband and I went out and bought her a new towel (we didn't have the hooded towels at that point) and a few bath toys.

After everything our little girl ABSOLUTELY loves bath time now and at times we can't even get her out of the tub without a little fuss.

So, with that here are our favorite bath items:

Johnson's Head-to-Toe Baby Wash - 28 oz. Munchkin - Squirtin' Lake Buddies, 10-PackThe First Years Sure Comfort Deluxe Tub - Pink Circo® Newborn Girls' Stripes and Hearts Hooded Towel - Pink Circo® Newborn Girls' 3 Pack Wash Cloth and Owl Scrubbie - Pink  Circo® Newborn Girls' 6 Pack Assorted Washcloth Set


We also use the little brush that was given to us from the hospital when we wash her hair and an old cup to rinse her off. We've been looking into a faucet cover since she's become such a mover and always wants to try and stand when we're washing her. I just haven't decided on whether or not I'd like the Munchkin Elephant Spout or the Puj Elephant Spout


What are your bath time favorites?

Thursday, July 31, 2014

Labeling E's Storage Tote

I decided to change over my previous blog to this blog. You can still find me over at twodaisiesandanelephant.blogspot.com. However, most of my blog posts from there will be transferred over to this one. So, at times you may see the "twodaisiesandanelephant" logo going across many of the photos. No worries, it is me. I promise.


Okay, so a few days ago I shared with you the fact of how I had stored Baby E's bassinet, swing, and bouncer in a large storage container. However, I didn't really talk about how I would come to recognize what was in that storage container. Besides having to remember. 

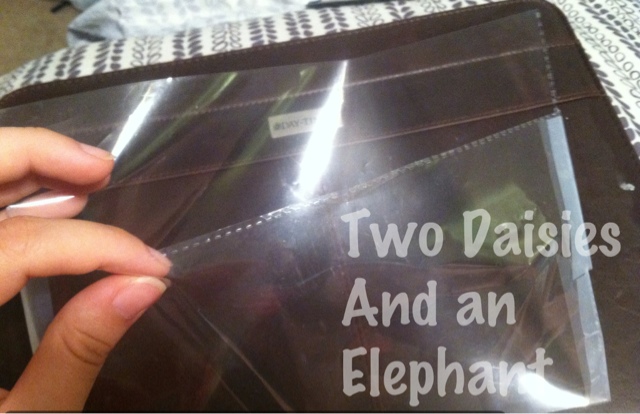
So, I grabbed the storage container that I had put everything in and put it to the side. Then I pulled out a few old sheet protectors and decided to cut them. I just went along the perforated edges and just cut/rip. Ending up with two sheets. 


I then printed up two signs. One to sit on the outside and the other to sit on the inside. 


After that, I went back to the sheet protector and folded it to make a large envelope. Once it was folded, I just grabbed some regular scotch tape and taped the ends shut. 


Once, it was all taped together. I opened it up just to make sure that it wouldn't come apart on me. 


Once I confirmed that it wouldn't rip open, I went ahead and placed the two sheets of paper inside of it. First to go in was the paper with the names of the stuff inside and then I placed the itemized list on the inside. 


Lastly, after everything was stuffed into the envelope. I just grabbed my tape and placed it onto the outside of the container. Mostly in a space that I knew I could see and easily access the list just in case. 


Once it was taped and all said and done. I just placed the storage container in Baby E's closet. She has the room and with the fact that it's been so hot especially in the attic... I'm just kind of being lazy and don't want to store it up there at the moment. Mostly, because I'd like to be able to breathe and not feel like I'm suffocating. So, for the time being until it get's cooler it's just going to hang out in her closet. Next to the storage bin with her clothes in it.

Oh, Hole No!

I decided to change over my previous blog to this blog. You can still find me over at twodaisiesandanelephant.blogspot.com. However, most of my blog posts from there will be transferred over to this one. So, at times you may see the "twodaisiesandanelephant" logo going across many of the photos. No worries, it is me. I promise.

Back in March we found a few places with what looked to be mold on the upper portions of the wall in our living room. Of course we were freaked out, especially with just buying the house back in December. So, we decided to go ahead and don some gear and break through the walls just to make sure there were not any major problems behind it. Fortunately, there was nothing. We decided to investigate a little further with a a few scrubbings and started to notice it was dirt and grime. The people who acquired this place before us just slapped some paint on the walls and called it a day. 

Now, pretty much 7 month's later we're finally getting to the holes. They were covered with contact paper to match the wall color. However, with E's birthday coming up I decided it was time to fix it. 

I just grabbed a few plaster patches from Walmart (they were about 2.97 for 2) and then a galvanized steel patch. Following the directions I placed the patches onto the walls and wet them. Then waited 30 minutes. 


After 30 minutes, I was able to cover them up. 


For my first time doing this, I think I did a pretty awesome job. Horrible place to have to sand, but in the end it looks good. I need to fix a corner piece where I caught it while sanding, but otherwise it's still holding strong. I just can't wait to paint it now. 

Wednesday, July 30, 2014

Storing E's Large Items

I decided to change over my previous blog to this blog. You can still find me over at twodaisiesandanelephant.blogspot.com. However, most of my blog posts from there will be transferred over to this one. So, at times you may see the "twodaisiesandanelephant" logo going across many of the photos. No worries, it is me. I promise.

Baby E has pretty much outgrown several of her essential items. So, the other day I decided it was time to pack them up. My baby girl is growing up. A bitter sweet moment.

So, before I started to pack everything up. I took pictures of everything. 
  • how the item looked (before I broke it down)
  • the items that belong with it (seating pads, screws, rods, etc.)
  • the labels (everything that I labeled)
  • everything together while it was broken down
Taking the pictures kind of helped me to remember everything that went together as well as hopefully help me in the future. 

~*~
Here are two of the items that I took pictures of before breaking them down. 


After I had taken the first picture, I began to break down the swing. I broke it down one by one and labeled everything as I broke it down. That way when we go to use it again for a future baby, we know how to put the stuff back together. This is mostly because my husband threw away the directions to the items and we can't find them on the companies websites.

 
Once everything was labeled and pictures taken, I placed them into the bin. I also grabbed all of the screws/tools and placed them in corresponding plastic sandwich bags. 

~*~
This is where it became tricky. I wanted to fit the swing, bassinet, and bouncer together in one box. And I was able to as well, except for the frame to the bassinet. That part didn't break down (I'll explain what I did with that part later). 

With trying to get everything to fit, I just had to find a way to get everything to work. I would lay out the different parts and move them around if necessary. 


Once, I got the basis down of how I wanted to lay the majority of the rods and especially the top of the swing. In the picture below, you can see that all the rods are in place for all three items. The top of the swing is laying on its side. I placed a few grocery bags around it to support it. I also took majority of the swings parts and placed it in the blue bag next to it. Also providing additional support.


Now, before placing the seat pads and other miscellaneous fabric parts into the bin; I made sure to wash each one. This way I could get any stains and funky smells that may have been embedded into the fabric. I can't stand putting dirty things away. Especially in storage. 

After everything was washed and dried, I placed them in several grocery bags and used those as cushions as well.

I then placed the seat to the swing on top of everything.


To ensure that the screws and other items that were in plastic baggies wouldn't fly everywhere in the bin or get lost at a future date, I decided to tape them to one side of the bin (on the inside).


After taping them to the side, I placed the swing cushion on top and then to top it all off... I also placed the wooden bottom and cushion of the bassinet on top of that.


Then closed the bin and that's all she wrote.


Now, all I have to do is write up the labels for the outside of the box.

Cork Board Project

I decided to change over my previous blog to this blog. You can still find me over a at twodaisiesandanelephant.blogspot.com. However, most of my blog posts from there will be transferred over to this one. So, at times you may see the "twodaisiesandanelephant" logo going across many of the photos. No worries, it is me. I promise.


I haven't quite figured out what I'm going to do with this cork board yet, but I'm thinking of quite a bit of possibilities! 

Here a few:

Thinking of maybe a place to store important notes in my makeshift office...
An art space for Baby E during each of the holidays...
A place to store menu's/weekly meals in the kitchen...
A place to store some of my husbands mini tools in the shed...